Two‑Tier PKI Design & Build Guide - AD CS with an Offline Root CA
This document describes a secure, production-ready two‑tier PKI built on Microsoft Active Directory Certificate Services (AD CS). It includes a technical design diagram, recommended network placement, security controls, and a step‑by‑step build guide for an offline root CA and one or more online issuing (subordinate) CAs.
Audience
Windows system administrators, PKI engineers, and infrastructure architects who will design, build, or operate AD CS in an enterprise environment.
Executive Summary
A two‑tier PKI separates the trust anchor (an offline root CA) from the operational issuing layer (online subordinate/issuing CAs). The offline root issues certificates only to subordinate CAs and remains offline except for rare administrative actions (signing/renewing subordinate CA certificates and publishing root CRLs). The online issuing CAs are domain‑joined, integrated with Active Directory for templates and auto‑enrollment, and handle day‑to‑day certificate issuance and revocation.
This design reduces the blast radius if an issuing CA is compromised while keeping management and automation convenient for clients.
Goals and Assumptions
- Provide strong key protection for the root CA by keeping it offline and physically protected.
- Enable automatic certificate enrollment for domain users and computers using Enterprise CAs and Group Policy.
- Publish CRLs and CA certificates to HTTP and LDAP locations reachable by clients.
- Support common enterprise certificate usages: machine authentication, user authentication (S/MIME / smart card), TLS for servers, and NPS/RADIUS.
Assumes Active Directory domain and reliable time sync (NTP), domain admin access for CA install, and Windows Server versions supported by AD CS.
High‑level Architecture (Technical Design Diagram)
Below is a diagram that represents the typical placement of servers and distribution points. Use this as a reference for Visio or another diagramming tool.
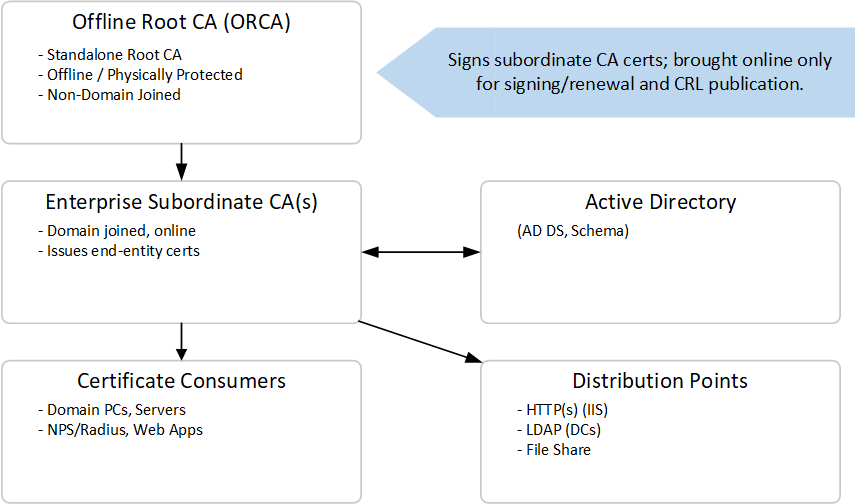
Key Points
- Put CRL/AIA files on a low‑latency HTTP server (IIS) and optionally on LDAP via AD replication.
- Configure CDP/AIA URLs so clients can retrieve both the CA cert and CRL without contacting the offline root directly.
Components & Roles
The offline root CA is a Standalone Root CA (not domain joined) used only to issue subordinate CA certificates and publish the root CRL. Subordinate CAs are Enterprise CAs (domain joined) and handle certificate issuance, templates, auto‑enrollment, and CRL publication for the issuing layer. Distribution points (HTTP and optionally LDAP) serve CA certificates and CRLs to clients.
Design Details and Recommendations
Crypto/Profile Choices
Use modern, strong algorithms (recommend RSA 4096 for CA keys or ECDSA/P256 if you have platform support). Use SHA‑256+ for hashes. Make CA validity for the root long (for example 15–20 years) and shorter for subordinate CAs (for example 5–10 years) so you can rotate subordinate keys more frequently if needed.
CDP/AIA
Configure CDP (CRL Distribution Points) and AIA (Authority Information Access) to include HTTP URLs that point to an internal web server (IIS) that you control. Also include publication to a file share if you use script‑based copies from the offline root. Configure the Subordinate CA to publish to the HTTP/LDAP locations expected by clients.
CRL Strategy
Have the root CA CRL long‑lived (e.g., weekly to yearly depending on policy) because the root itself revokes very few certificates; subordinate CA CRLs are typically published more often and should be hosted on highly available HTTP servers. Consider using delta CRLs or OCSP responders for high‑availability/low‑latency environments.
Auto‑Enrollment and Templates
Use AD CS certificate templates and Group Policy auto‑enrollment for machines and users. Restrict template publish/permissions to authorized groups.
Monitoring and Auditing
Enable auditing of the CA servers and monitor issuing activity, certificate approval/denial, and CRL publication.
Backups and Recovery
Backup CA private keys, the CA database, and the system state regularly. Store backups encrypted, offsite, and under strict access control. Test the restore procedure.
Step‑by‑Step Build Guide
Follow these steps in order. This is written as a practical, repeatable checklist. Replace example names with your environment's names.
Prerequisites
- Prepare at least three servers (or VMs): ONE for the offline root CA (not domain joined), ONE for the enterprise subordinate/issuing CA (domain joined), and ONE or more for hosting HTTP CDP/AIA distribution points (IIS). You will also need a healthy domain controller.
- Ensure each server has a static IP, correct FQDN, and that time synchronization is configured (important for certificate validation).
- Identify the Domain and Enterprise Admin accounts that will perform installs. Ensure you have secure removable media for transferring requests and certificates to/from the offline root.
- Decide on key algorithms, key lengths, CA common names, CRL URLs, and certificate lifetimes. Document them.
Step 1 - Build the Offline Root CA (Stand‑alone)
Install Windows Server on the offline root host. Harden OS per your baseline and physically secure the box. If you plan to use BitLocker, configure it now.
Do not join the machine to AD. The root CA should be standalone.
Install the AD CS binaries (you can copy the install media to the root system if needed) or run the Server Manager Add Roles wizard. The simplest PowerShell commands (run as Administrator) to install the feature are:
Install-WindowsFeature -Name ADCS-Cert-Authority -IncludeManagementTools


Install-AdcsCertificationAuthority -CAType StandaloneRootCA -CACommonName "Contoso Root CA" -CryptoProviderName "RSA#Microsoft Software Key Storage Provider" -KeyLength 4096 -HashAlgorithmName SHA256 -ValidityPeriod Years -ValidityPeriodUnits 20
Note: the command above is an example. If you prefer the GUI, run Add Roles and Features → Active Directory Certificate Services → Certification Authority → Setup Type = Standalone → Root CA.
(Optional) Create a C:\Windows\CAPolicy.inf before installation if you need to set specific CA policy extensions (name constraints, certification policy OIDs, CRL locations built into the CA certificate). A minimal CAPolicy.inf for a root might look like this:
[Version]

Signature="$Windows NT$"


[PolicyStatementExtension]

Policies = LegalPolicy


[LegalPolicy]

OID=1.2.3.4.1455.67.89.5

Notice="Contoso PKI policy"

URL=http://pki.contoso.local/policy/cps.txt


[CRLDistributionPoint]

Empty=True

[AuthorityInformationAccess]

Empty=True


[Certsrv_Server]

RenewalKeyLength=4096

RenewalValidityPeriod=Years

RenewalValidityPeriodUnits=20
Creating CAPolicy.inf allows you to embed policy information and influence the CA certificate's extensions at creation time.
After installation, export the Root CA certificate (public only) to a file (DER or Base‑64) and also copy the CRL (initial CRL) from C:\Windows\System32\CertSrv\CertEnroll.
Secure the offline root. Power it down or disconnect it from networks after you have the cert/CRL files. Store the root in a safe place and limit physical access.
Step 2 - Prepare Distribution Points (IIS / LDAP / FileShare)
Prepare an internal web server (IIS) that will host the CertEnroll virtual directory (for example http://pki.contoso.local/pki/). Create a file share or virtual directory that will be used to store .crt and .crl files. Ensure clients can access this URL.
For LDAP distribution, ensure domain controllers will host the LDAP paths; AD replication handles distribution of published CA certs and CRLs.
Step 3 - Install the Enterprise Subordinate CA (Issuing CA)
On the subordinate server (domain joined), install the AD CS role binaries and management tools:
Install-WindowsFeature -Name ADCS-Cert-Authority -IncludeManagementTools
Create a certificate request for a subordinate CA. You can use the AD CS Configuration wizard (Server Manager → Add Roles and Features → configure AD CS → Certification Authority → Setup Type = Enterprise → Subordinate CA) and choose the option to save a certificate request to a file. Or use PowerShell to pre‑create the request:
Install-AdcsCertificationAuthority -CAType EnterpriseSubordinateCA -OutputCertRequestFile C:\Temp\SubCA.req -CACommonName "Contoso Issuing CA" -KeyLength 4096 -CryptoProviderName "RSA#Microsoft Software Key Storage Provider" -HashAlgorithmName SHA256
The wizard will produce a request file (PKCS #10 or similar) and keep the private key on the subordinate server.
Transfer the request file to removable media or other approved means and carry it to the offline root CA. Do not use an untrusted channel.
Step 4 - Sign the subordinate request on the Offline Root CA
On the offline root CA (bring it online temporarily if necessary, with network interfaces disabled if you prefer), open the Certification Authority snap‑in or the web enrollment site (if configured).
Submit the subordinate request for issuance. You can use the certreq utility to sign a request or use the CA web interface. A common approach is:
- Place the subordinate request file on the root CA.
- Use certreq -submit SubCA.req SubCA.cer to submit and get a certificate file, or use the Certification Authority console to locate the pending request and issue it. If using the Certification Authority console, the flow is: Pending Requests → Right‑click the request → All Tasks → Issue, then export the issued certificate from Issued Certificates.
Export the resulting subordinate certificate file (Base‑64 / DER). If a PKCS#12 bundle is required by your chosen method, create it from the root CA tools (in many scenarios the subordinate's private key remains on the subordinate server so you only need to deliver the issued .cer).
Copy the subordinate certificate back to removable media and return it to the subordinate server.
Step 5 - Complete the Subordinate CA installation
On the subordinate server, complete the AD CS configuration: if you used the GUI wizard, import the returned subordinate certificate when prompted (or if you used PowerShell, use the Existing Certificate parameter set):
# Example: install using returned PFX (if you created a pfx containing the CA cert and key)


Install-AdcsCertificationAuthority -CAType EnterpriseSubordinateCA -CertFile C:\Certs\SubCA.pfx -CertFilePassword (Read-Host "PFX password" -AsSecureString)
If the private key was generated on the subordinate (typical when using -OutputCertRequestFile), the GUI will normally allow you to complete the pending request and install the certificate, completing the CA installation.
Configure the subordinate CA properties: set CA database paths, set CRL/AIA extensions (Extensions tab), and configure CRL publication options. Point CDP/AIA to the HTTP and LDAP locations you prepared earlier.
Restart the AD CS service if prompted.
Step 6 - Publish CA certificates and CRLs to distribution points
On the issuing CA, publish its own CRL and certificate into locations reachable by clients. Use the Certification Authority MMC or run certutil -crl to generate the current CRL. Copy C:\Windows\System32\CertSrv\CertEnroll\*.crl and *.crt to the IIS share (for example \\WEB1\pki or C:\inetpub\wwwroot\pki).
On the offline root (when you bring it up to publish the root CRL), publish a new root CRL. The CA console method is: expand the root CA → right‑click Revoked Certificates → All Tasks → Publish → select `New CRL` (or Delta if configured). Then copy the root CRL/cert files to the distribution points.
Verify CDP/AIA URLs are reachable from clients and that pkiview.msc or certutil -verify reports healthy availability.
Step 7 - Configure Certificate Templates and Auto‑enrollment
In the Certificate Templates MMC, duplicate and configure templates for user, machine, server, and subordinate usages. Set key usage, private key protection, and validity periods appropriate for the template.
In the Certification Authority console, publish the templates you need.
Configure Group Policy for auto‑enrollment. In Group Policy Management Editor, navigate to Computer Configuration → Policies → Windows Settings → Security Settings → Public Key Policies → Certificate Services Client – Auto‑Enrollment and enable auto‑enroll for machines (and similarly for users). After applying the GPO, run gpupdate /force and verify enrollment.
Step 8 - Tests and validation
After completing installation and configuration, perform the following validation steps to ensure the PKI functions properly and securely:
Verify Auto‑Enrollment
Confirm that domain machines automatically enroll for computer certificates. Open the Certificates MMC snap‑in (Local Computer → Personal → Certificates) and check that a certificate issued by the Enterprise Subordinate CA appears.
Test Web Server TLS
Configure an internal web server with a certificate issued by your CA and ensure HTTPS connections succeed without certificate errors.
Test Revocation Checking
Revoke a test certificate on the issuing CA, publish a new CRL, and verify that clients detect the revocation by running certutil -verify /urlfetch.
Validate CRL/AIA Distribution
From a client system, use certutil -url to confirm that HTTP and LDAP distribution points are reachable and provide the correct CRL and CA certificates.
Confirm Chain of Trust
On a client, open the issued certificate and verify that the certification path shows both the subordinate CA and root CA as trusted. Ensure no warnings appear in the chain.
Inspect PKI Health with PKIView
Run pkiview.msc on an administrative workstation to confirm all CDP/AIA locations and CRL statuses show green (valid and accessible).
Validate NTAuth Store (if applicable)
For smart card logon or other Kerberos‑based uses, ensure the issuing CA’s certificate is published in the NTAuthCertificates container. Use certutil -viewstore NTAuth to check.
Simulate Certificate Renewal
Request a renewal of a test certificate template to confirm that auto‑renewal functions as expected when nearing expiration.
OCSP/Delta CRL test (if configured): If you deployed an Online Responder or delta CRLs, verify that clients can retrieve revocation information from these sources without delay.
Audit Log Verification
Review Security and Application event logs on the CAs to confirm that issuance and revocation activities are properly logged and auditable.
Completion of these validation steps ensures that your two‑tier PKI operates as intended, with clients trusting the chain, revocation information accessible, and enrollment/renewal functioning automatically.
Step 9 - Backup, Maintenance, and Lifecycle Operations
Once your PKI is validated and operational, regular maintenance and proper lifecycle management ensure continued reliability and security.
Backups
Perform scheduled backups of the CA database, private keys, and system state. Use certutil -backupDB and certutil -backupKey on each CA. Store the backups on encrypted removable media, separate from the CA servers, and maintain an offsite copy in a secure vault. Document encryption passwords and key recovery procedures.
CRL and Certificate Renewal
Monitor certificate expiration dates for subordinate and issued certificates. Renew the subordinate CA certificate well before expiration. For CRLs, automate publishing (for the issuing CA) and schedule reminders to generate a new root CA CRL manually at defined intervals.
Patch Management
Apply Windows updates to online issuing CAs regularly. Never connect the offline root CA to the network; instead, apply patches manually via scanned media after verification.
Auditing and Monitoring
Review CA logs weekly for anomalies or failed issuance attempts. Use Event Viewer or central log collection (e.g., SIEM) to capture Security and Application logs. Periodically review template permissions.
Lifecycle Planning
Establish a defined process for certificate template updates, root/subordinate renewal, and eventual CA decommissioning. Document every administrative action in a PKI operations runbook.
Useful File Snippets and Examples
Example CAPolicy.inf for the Offline Root CA:
[Version]

Signature="$Windows NT$"

[PolicyStatementExtension]

Policies=InternalPolicy

[InternalPolicy]

OID=1.2.3.4.1455.67.89.5

Notice="Company Internal Root Policy"

URL=http://pki.example.com/policy/internalrootpolicy.pdf

[Certsrv_Server]

RenewalKeyLength=4096

RenewalValidityPeriod=Years

RenewalValidityPeriodUnits=20

CRLPeriod=52

CRLPeriodUnits=Weeks

CRLOverlapPeriod=12

CRLOverlapUnits=Hours

LoadDefaultTemplates=0

[CRLDistributionPoint]

URL=http://pki.example.com/pki/rootca.crl

[AuthorityInformationAccess]

URL=http://pki.example.com/pki/rootca.crt
Example CAPolicy.inf for the Issuing CA:
[Version]

Signature="$Windows NT$"

[Certsrv_Server]

RenewalKeyLength=4096

RenewalValidityPeriod=Years

RenewalValidityPeriodUnits=10

CRLPeriod=1

CRLPeriodUnits=Weeks

CRLDeltaPeriod=1

CRLDeltaPeriodUnits=Days

LoadDefaultTemplates=1

[CRLDistributionPoint]

URL=http://pki.example.com/pki/issuingca.crl

[AuthorityInformationAccess]

URL=http://pki.example.com/pki/issuingca.crt
Publish CRL from the offline root (example):
certutil -crl

copy C:\Windows\System32\CertSrv\CertEnroll\*.crl \\fileserver\pki\
Submit Subordinate CA CSR and sign on root CA:
certreq -submit -attrib "CertificateTemplate:SubCA" subca.req
Validate chain on a client:
certutil -verify subca.cer
Operational Checklist (First 90 Days)
Week 1–2:
Confirm all CDP/AIA URLs are reachable from client systems.
Validate that the CRL and CA certificate are available from the web distribution point.
Week 3–4:
Review audit logs for issuance and revocation entries.
Perform backup test of CA database and private key.
Month 2:
Test revocation and renewal again using a new test certificate.
Validate PKI health using pkiview.msc.
Month 3:
Document findings, update runbook.
Plan next quarterly maintenance, including patch validation for issuing CAs.
Appendix - Further Reading and References
Microsoft official references:
Active Directory Certificate Services Overview
Designing and Implementing a PKI
Best Practices for Implementing Windows Server PKI
Additional resources:
NIST SP 800-32, “Introduction to Public Key Technology and the Federal PKI Infrastructure.”
RFC 5280, “Internet X.509 Public Key Infrastructure Certificate and CRL Profile.”
About this post
Posted: 2025-10-08
By: dwirch
Viewed: 333 times
Categories
Attachments
PKCI ADCS Offline Root Two Tier Infra.png
Posted: 10/8/2025 12:24:21 PM
Size: 23,049 bytes
Loading Comments ...
Comments
No comments have been added for this post.
You must be logged in to make a comment.